Are you a Minecraft enthusiast looking to create your very own server and play with friends? Look no further! This guide will take you step-by-step through the process of setting up a Minecraft server and inviting your friends to join in on the fun.
With the ability to customize game modes, plugins, and more, creating a Minecraft server provides endless hours of entertainment. Plus, playing with friends adds a whole new level of excitement and adventure. So, grab your pickaxe, and let’s get started on creating your very own Minecraft server!
How to Create a Minecraft Server and Play With Friends?
Firstly, download the Minecraft server software from the official Minecraft website.
Next, create a new folder and place the downloaded server software into it.
Now, run the server software and allow it to generate the necessary files.
After that, modify the server settings to your liking and add your friends’ usernames to the whitelist.
Finally, share your server’s IP address with your friends and start playing together!
How to Create a Minecraft Server and Play With Friends?
If you’re a Minecraft player, you may have thought about creating your own server to play with your friends. It’s not as complicated as it may seem, and it can be a fun and rewarding experience. In this article, we’ll go over the steps you need to follow to create your own Minecraft server and play with your friends.
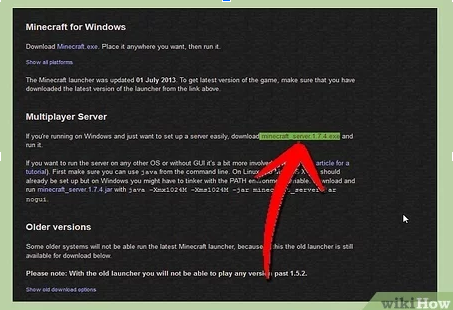
Step 1: Download the Minecraft Server Software
The first thing you need to do is download the Minecraft server software from the official Minecraft website. You can download it for free, and it’s available for Windows, Mac, and Linux. Once you’ve downloaded the software, you’ll need to install it on your computer.
After installing the software, you’ll need to open the Minecraft server properties file. This file contains the settings for your server, such as the server name, the server port, and the maximum number of players. You can customize these settings to fit your needs.
Step 2: Set Up Port Forwarding
To allow your friends to connect to your server, you’ll need to set up port forwarding on your router. Port forwarding allows traffic from the internet to reach your server. You’ll need to log in to your router’s settings and configure the port forwarding settings.
To set up port forwarding, you’ll need to know your server’s IP address and the port number you’re using. You can find your IP address by typing “ipconfig” in the command prompt. The port number you’re using is set in the Minecraft server properties file.
Step 3: Invite Your Friends to Join
Now that your server is up and running, it’s time to invite your friends to join. You’ll need to give them your server’s IP address and the port number you’re using. They’ll need to enter this information into their Minecraft client to connect to your server.
You can also set up a whitelist to restrict access to your server. This is useful if you only want to play with a specific group of friends. You can add their Minecraft usernames to the whitelist in the server properties file.
Step 4: Customize Your Server
Once your friends have joined your server, you can start customizing it to fit your needs. You can install plugins and mods to add new features to your server. You can also change the server settings, such as the game mode and difficulty level.
You can also create your own custom Minecraft skins and textures to make your server unique. There are many resources available online to help you create your own skins and textures.
Step 5: Back Up Your Server
It’s important to regularly back up your server to prevent data loss. You can use a backup plugin to automatically back up your server on a regular basis. You can also manually back up your server by copying the server files to a separate location.
Step 6: Troubleshooting
If you’re experiencing issues with your server, there are a few things you can try to fix the problem. You can check the server logs to see if there are any errors or warnings. You can also try restarting the server or reinstalling the server software.
If you’re still having issues, you can reach out to the Minecraft community for help. There are many forums and online communities dedicated to Minecraft server hosting.
Benefits of Creating Your Own Minecraft Server
Creating your own Minecraft server can be a fun and rewarding experience. You have complete control over your server, and you can customize it to fit your needs. You can also play with your friends without having to worry about griefers or other unwanted players.
Playing on a public Minecraft server can be fun, but it can also be frustrating. You may encounter griefers or other unwanted players who can ruin your gaming experience. You also have limited control over the server, and you may not be able to customize it to your liking.
By creating your own Minecraft server, you can avoid these issues and have a more enjoyable gaming experience. You can play with your friends in a safe and secure environment, and you can customize your server to fit your needs.
Conclusion
Creating your own Minecraft server is a fun and rewarding experience. It’s not as complicated as it may seem, and it can provide you with a safe and secure environment to play with your friends. Follow the steps outlined in this article, and you’ll be up and running in no time!
Frequently Asked Questions
Here are some frequently asked questions and answers about how to create a Minecraft server and play with friends:
How do I create a Minecraft server?
Creating a Minecraft server is not as difficult as it may seem. First, you need to download the Minecraft server software from the official Minecraft website. Once you have downloaded the software, you need to run it and configure the server settings. You can set the server name, game mode, difficulty level, and other settings according to your preferences. After that, you need to open the server port on your router and share the server IP address with your friends to join the server.
It is important to note that hosting a Minecraft server requires a powerful computer with a stable internet connection. Also, you need to keep the server software up-to-date to ensure a smooth gameplay experience for all players.
How do I join a Minecraft server?
To join a Minecraft server, you need to have the server IP address and the game version that the server is running. Once you have that information, open the Minecraft game and click on the “Multiplayer” option. From there, click on the “Add Server” button and enter the server IP address and a name for the server. After that, click on the “Join Server” button to connect to the server and start playing with your friends.
If you are unable to connect to the server, make sure that you have entered the correct IP address and that the server is online and running the same game version as you.
How many players can join a Minecraft server?
The number of players that can join a Minecraft server depends on the server hosting capacity and the server settings. Some servers can host a few players, while others can host hundreds or even thousands of players. It is important to note that hosting a large number of players requires a powerful server and a stable internet connection to avoid lag or game crashes.
If you are hosting a server for a small group of friends, you can set the maximum number of players according to your preferences. However, if you want to host a public server, you need to consider the server capacity and the gameplay experience for all players.
Can I customize a Minecraft server?
Yes, you can customize a Minecraft server according to your preferences. You can install plugins, mods, and texture packs to enhance the gameplay experience or add new features to the game. However, it is important to note that not all plugins or mods are compatible with each other or with the game version that the server is running.
Before installing any plugins or mods, make sure that you have read the instructions carefully and that they are compatible with the server and the game version. Also, keep in mind that some plugins or mods may affect the server performance or the gameplay balance.
What are some tips for hosting a Minecraft server?
Hosting a Minecraft server can be a fun and rewarding experience, but it requires some effort and planning to ensure a smooth gameplay experience for all players. Here are some tips for hosting a Minecraft server:
1. Choose a reliable hosting service or a powerful computer with a stable internet connection.
2. Keep the server software up-to-date and configure the server settings according to your preferences.
3. Set clear rules and guidelines for the players to follow, and enforce them when necessary.
4. Install plugins or mods that enhance the gameplay experience or add new features to the game.
5. Monitor the server performance and the player feedback regularly, and make adjustments accordingly.
How to Make a Minecraft Server 1.19 – (Play Minecraft Java with Your Friends)
How to Make a Minecraft Server 1.19 – (Play Minecraft Java with Your Friends)
In conclusion, creating a Minecraft server and playing with friends is a fun and rewarding experience. By following the simple steps outlined in this guide, you can easily set up your own server and invite your friends to join in on the fun.
Not only does having your own server give you greater control over the game, but it also allows you to customize the experience to your liking. You can add plugins, and mods, and even change the game mode to create a unique and personalized experience for you and your friends.
So why wait? Get started today and create your own Minecraft server. With a little bit of effort and patience, you’ll be playing with your friends in no time and having a blast exploring, building, and surviving in the world of Minecraft.