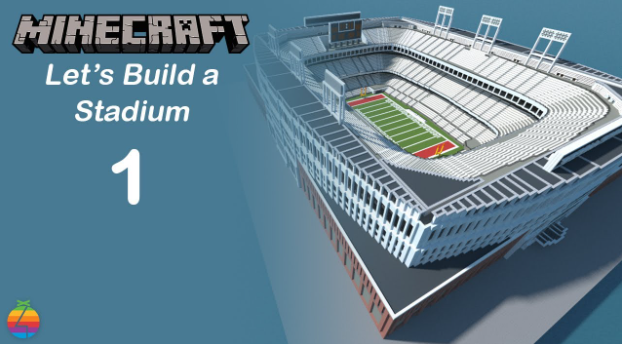
Are you a Minecraft enthusiast looking to take your gaming skills to the next level? Imagine hosting your own Minecraft competitions in a stadium you built yourself! Whether you’re a seasoned player or a beginner, building a Minecraft stadium can be an exciting and rewarding challenge. With a bit of creativity, planning, and patience, you can create an epic arena for you and your friends to battle it out in the world of Minecraft.
In this guide, we will walk you through the step-by-step process of building a Minecraft stadium from scratch. From choosing the right location and materials to designing the layout and adding the finishing touches, we’ll cover everything you need to know to create a stadium that will impress even the most seasoned Minecraft players. So grab your pickaxe, gather your resources, and let’s get started on building your very own Minecraft stadium!
How to Build a Minecraft Stadium and Host Epic Competitions?
1. Choose a flat area to build your stadium.
2. Design the stadium using blocks like quartz, stone, and colored wool.
3. Add seating areas for spectators using stairs and slabs.
4. Create a playing field using grass blocks and white lines.
5. Add scoreboards and other details using signs and item frames.
6. Host epic competitions by inviting players and setting rules and prizes.
Building a Minecraft Stadium for Epic Competitions
Are you a Minecraft enthusiast looking to host epic competitions in your world? Building a stadium is the perfect way to bring your community together and showcase your creativity. Follow these steps to create a Minecraft stadium that will impress your friends and competitors alike.
Step 1: Choose a Location
The first step in building a Minecraft stadium is choosing the perfect location. Look for a flat area that is easily accessible and has enough space to accommodate your stadium design. Consider the surrounding terrain and make sure there are no obstacles that will interfere with gameplay.
Once you have selected a location, clear the area of any trees or other obstructions. Use a shovel to level the ground and create a smooth playing surface. If necessary, add a layer of grass or dirt to cover any uneven spots.
Step 2: Plan Your Design
Before you start building your stadium, you need to have a clear plan in place. Decide on the size and shape of your stadium, as well as any additional features such as seating or scoreboards. Use graph paper or a digital design tool to sketch out your ideas and make adjustments as needed.
Once you have a solid plan in place, gather the materials you will need to build your stadium. This may include blocks such as stone, wood, and glass, as well as decorative items like banners and signs.
Step 3: Build the Foundation
The foundation of your Minecraft stadium is the most important part of the construction process. Start by laying out the perimeter of your stadium using blocks or fence posts. Use a shovel to dig out the inside of the stadium, creating a playing field that is at least 20 blocks wide and 30 blocks long.
Next, build the walls of your stadium using the blocks you have chosen. Consider adding windows or other decorative elements to make your stadium stand out. Finally, add a roof to protect players and spectators from the elements.
Step 4: Add Seating
No stadium is complete without seating for spectators. Use stairs or slabs to create rows of seats around the perimeter of your stadium. Consider adding VIP sections or luxury boxes for special guests.
If you want to add even more realism to your stadium, consider adding concession stands or restrooms for your guests.
Step 5: Install Scoreboards
Scoreboards are an essential part of any Minecraft competition. Use signs or banners to create a scoreboard that will keep track of the score and the time remaining. You can also use redstone circuits to create a more advanced scoreboard that displays real-time information.
Step 6: Create Locker Rooms
If you plan on hosting team competitions, you will need locker rooms for your players. Use signs or item frames to create lockers where players can store their equipment. You can also use chests to store items like potions or food.
Step 7: Add Decorative Touches
The finishing touches on your Minecraft stadium will set it apart from others. Consider adding banners or flags in your team’s colors to create a sense of team spirit. You can also add decorative elements like fountains or statues to create a more immersive experience.
Step 8: Host Your Competition
Once your stadium is complete, it’s time to host your first competition. Invite your friends and competitors to participate and show off your new creation. Use the scoreboards to keep track of the score and time remaining, and have fun!
Step 9: Benefits of Building a Minecraft Stadium
Building a Minecraft stadium is a great way to showcase your creativity and bring your community together. It provides a fun and interactive way to host competitions and events, and can even be used for educational purposes.
By building a stadium, you can also improve your building skills and gain experience in Minecraft architecture.
Step 10: Minecraft Stadium Vs Real Life Stadiums
While real-life stadiums may be impressive, a Minecraft stadium offers a unique experience that cannot be replicated in the real world. With unlimited creativity and the ability to customize every detail, Minecraft stadiums can be tailored to fit any theme or event.
Additionally, building a Minecraft stadium is much more affordable and accessible than building a real-life stadium. It’s a great way to experience the excitement of hosting competitions without breaking the bank.
In conclusion, building a Minecraft stadium is a fun and rewarding experience that will provide endless hours of entertainment for you and your friends. Follow these steps to create your own stadium and start hosting epic competitions today.
Frequently Asked Questions
In this section, we’ll provide answers to some of the most frequently asked questions about building a Minecraft stadium and hosting epic competitions.
What are the basic requirements for building a Minecraft stadium?
Before you start building your Minecraft stadium, you need to ensure that you have all the necessary materials. You will need a lot of blocks, including stone, wood, glass, and wool. You will also need redstone, torches, and buttons to create lighting and special effects. In addition, you will need to decide on the size and shape of your stadium, as well as the type of seating and other features you want to include.
Once you have gathered all the materials and planned out your stadium, you can start building. Begin by laying the foundation and building the walls, then move on to creating the seating and other features. Be sure to add plenty of lighting and decorations to make your stadium look amazing.
How can I make my Minecraft stadium look impressive?
To make your Minecraft stadium look impressive, you need to focus on the details. This includes adding plenty of lights and special effects, such as fireworks and particle effects. You can also use banners, signs, and other decorations to add color and personality to your stadium.
In addition, you should pay attention to the seating and other features. Make sure that the seating is comfortable and easy to access, and that the field is properly marked and decorated. You can also add scoreboards, announcers’ booths, and other features to make your stadium look and feel like a real sports venue.
How can I host epic competitions in my Minecraft stadium?
To host epic competitions in your Minecraft stadium, you need to create a set of rules and guidelines that all players must follow. This includes deciding on the type of competition you want to host, such as a PvP tournament or a race, and setting up the rules and objectives for each event.
You should also promote your competitions to other Minecraft players and communities to attract participants. You can use social media, forums, and other online platforms to advertise your events and build a following. Finally, you should ensure that you have the necessary resources, such as staff and equipment, to manage and run your competitions smoothly.
What are some common mistakes to avoid when building a Minecraft stadium?
One common mistake when building a Minecraft stadium is not planning out the design and layout in advance. This can lead to a disorganized and cluttered stadium that is difficult to navigate and use. Another mistake is not paying enough attention to lighting and special effects, which can make your stadium look dull and unimpressive.
You should also avoid using too many different types of blocks and materials, as this can make your stadium look messy and confusing. Finally, make sure that your stadium is properly tested and optimized for performance, especially if you plan to host large and complex events.
How can I get inspiration for building my Minecraft stadium?
There are many resources available online for getting inspiration and ideas for building your Minecraft stadium. You can search for images and videos of other Minecraft stadiums and sports venues to get an idea of the design and layout. You can also browse Minecraft forums and communities for tips and advice from other players.
Another great way to get inspiration is to visit real-life sports venues and stadiums. Take note of the layout, seating, and other features, and think about how you can replicate these in Minecraft. Finally, don’t be afraid to experiment and try out new ideas and designs to make your stadium truly unique and impressive.
My TOP 15 Stadiums in Minecraft | MEGABUILDS | 42 Pineapples | 4K
In conclusion, building a Minecraft stadium and hosting epic competitions can be an exciting and rewarding experience. By following the steps outlined above, you can create a venue that will draw in players from all over the world. With careful planning, attention to detail, and a bit of creativity, you can design a stadium that is both functional and visually stunning.
But building the stadium is only the first step. To truly host epic competitions, you’ll need to create engaging and challenging gameplay experiences. This means designing custom game modes, creating unique challenges, and fostering a community of players who are passionate about the game. With the right approach, you can turn your Minecraft stadium into a hub of competitive gaming that will attract players from all over.
In the end, building a Minecraft stadium and hosting epic competitions is about more than just playing a game. It’s about creating a community of players who share a love of gaming and competition. With the right approach, you can build a stadium that will become a hub for this community, and host events that will be talked about for years to come. So what are you waiting for? Start planning your Minecraft stadium today!


